
Cluster Stack Software from scratch on CentOS 7
1. Introduction
This tutorial will demonstrate you how to setup a high availability cluster running on CentOS 7.
For that, we are going to use a cluster stack including two open source softwares :
- Corosync : cluster communication layer, located at the bottom of the cluster stack due to its close relation to the transport layer. Allows communication between cluster members through the transport layer.
- Pacemaker : cluster resource management layer, located at the top of the cluster stack due to its connection to operation system applications. Allows resource management to start, stop and manage applications in the cluster.
The following diagram represents the communication process and shows how the cluster stack software fits between the service layers :

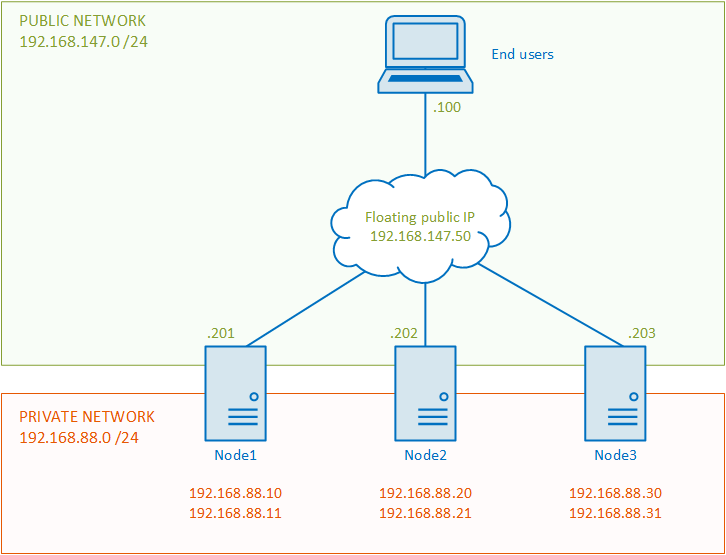
2. Goal
When completed, you will have this infrastructure, or something like that (I hope !) :
3. Preparing the servers
In my lab, I will use three virtual servers with the following hardware :
- CPU : 1 core
- RAM : 1 GB
- Hard disk : 20 GB
- Network : 3 network cards (two private / one public)
In a production environment, it’s a best practice to have a separate network subnet for cluster communication and each cluster node should have at least two network interfaces. And we will use one public for our tests from a end user computer.
As we can see on my scheme above, the assigned static cluster node IP addresses are :
- node1.centos.local -> 192.168.88.10, 192.168.88.11
- node2.centos.local -> 192.168.88.20, 192.168.88.21
- node3.centos.local -> 192.168.88.30, 192.168.88.31
3.1 Network configuration
Well now that we have connected and powered on all cluster nodes.
We can start with the network configuration, for that edit on each cluster node these files :
/etc/sysconfig/network-scripts/ifcfg-enoXXXX
TYPE=Ethernet
BOOTPROTO=none
DEFROUTE=yes
IPV4_FAILURE_FATAL=no
IPV6INIT=yes
IPV6_AUTOCONF=yes
IPV6_DEFROUTE=yes
IPV6_FAILURE_FATAL=no
NAME=eth1
DEVICE=eno33554960
ONBOOT=yes
IPADDR=192.168.88.10
PREFIX=24
IPV6_PEERDNS=yes
IPV6_PEERROUTES=yes
IPV6_PRIVACY=no
NM_CONTROLLED=no
- Change
BOOTPROTOto none (because this interface has a static IP address) - Add
IPADDR,NETMASK - Add
NM_CONTROLLEDto no (disable the network manager for this interface)
When we have completed all those tasks, we should be able to ping each cluster node :
[root@node1 ~]# ping 192.168.88.20 -c4

PING 192.168.88.20 (192.168.88.20) 56(84) bytes of data.
64 bytes from 192.168.88.20: icmp_seq=1 ttl=64 time=0.223 ms
64 bytes from 192.168.88.20: icmp_seq=2 ttl=64 time=0.287 ms
64 bytes from 192.168.88.20: icmp_seq=3 ttl=64 time=0.312 ms
64 bytes from 192.168.88.20: icmp_seq=4 ttl=64 time=0.265 ms

--- 192.168.88.20 ping statistics ---
4 packets transmitted, 4 received, 0% packet loss, time 3001ms
rtt min/avg/max/mdev = 0.223/0.271/0.312/0.038 ms
3.2 NTP configuration
It’s an important step, our cluster nodes must always be synchronized.
We can install the NTPD package :
[root@node1 ~]# yum install ntpd -y
By default, NTP uses the following servers :
[root@node1 ~]# cat /etc/ntp.conf | grep "server"
# Use public servers from the pool.ntp.org project.
server 0.centos.pool.ntp.org iburst
server 1.centos.pool.ntp.org iburst
server 2.centos.pool.ntp.org iburst
server 3.centos.pool.ntp.org iburst
Instead of them I recommend using nearest ones of our location, check this website http://www.pool.ntp.org/ and edit the NTP configuration file at /etc/ntp.conf.
Then, make sure that the NTP service starts at boot :
[root@node1 ~]# systemctl enable ntpd
Repeat that and install/start the NTP service on all cluster nodes.
3.3 DNS configuration
In my lab, I use two DNS servers, one primary and another one backup.
Configure them on each cluster node :
[root@node1 ~]# cat /etc/resolv.conf
nameserver 192.168.147.101
nameserver 192.168.147.102
search centos.local
Next, edit the FQDN hostname server :
[root@node1 ~]# cat /etc/hostname
node1.centos.local
If you don’t use DNS servers, just edit /etc/hosts and add all private IPs like that :
[root@node1 ~]# cat /etc/hosts
127.0.0.1       localhost localhost.localdomain localhost4 localhost4.localdomain4
::1             localhost localhost.localdomain localhost6 localhost6.localdomain6
192.168.88.10   node1.centos.local node1
192.168.88.11   node1.centos.local node1
192.168.88.20   node2.centos.local node2
192.168.88.21   node2.centos.local node2
192.168.88.30   node3.centos.local node3
192.168.88.31   node3.centos.local node3
To finish, check the connectivity among the cluster nodes :
[root@node1 ~]# ping node2.centos.local -c4
PING node2.centos.local (192.168.88.20) 56(84) bytes of data.
64 bytes from node2.centos.local (192.168.88.20): icmp_seq=1 ttl=64 time=0.205 ms
64 bytes from node2.centos.local (192.168.88.20): icmp_seq=2 ttl=64 time=0.280 ms
64 bytes from node2.centos.local (192.168.88.20): icmp_seq=3 ttl=64 time=0.257 ms
64 bytes from node2.centos.local (192.168.88.20): icmp_seq=4 ttl=64 time=0.258 ms

--- node2.centos.local ping statistics ---
4 packets transmitted, 4 received, 0% packet loss, time 3002ms
rtt min/avg/max/mdev = 0.205/0.250/0.280/0.027 ms
4. Installating and configuring Corosync
4.1 Allow Corosync traffic
By default, Corosync cluster communication ports are 5404 and 5405 (UDP protocol).
So we must allow the corosync traffic among the cluster nodes, for that we will add two rules to allow UDP traffic on 5404 and 5405 ports :
[root@node1 ~]# firewall-cmd --permanent --add-port=5404/udp
success
[root@node1 ~]# firewall-cmd --permanent --add-port=5405/udp
success
Moreover, do not forget to reload the firewall configuration :
[root@node1 ~]# firewall-cmd --reload
success
4.2 Install and enable Corosync at the boot
Then, install the corosync package on all cluser nodes and start it at the boot :
[root@node1 ~]# yum install corosync -y
[root@node1 ~]# systemctl enable corosync
4.3 Generate an encryption key
After that, generate an encryption key which encrypts cluster communication traffic :
[root@node1 ~]# corosync-keygen
Gathering 1024 bits for key from /dev/random.
Press keys on your keyboard to generate entropy.
Press keys on your keyboard to generate entropy (bits = 152).
Press keys on your keyboard to generate entropy (bits = 216).
Press keys on your keyboard to generate entropy (bits = 280).
Press keys on your keyboard to generate entropy (bits = 344).
Press keys on your keyboard to generate entropy (bits = 408).
Press keys on your keyboard to generate entropy (bits = 472).
Press keys on your keyboard to generate entropy (bits = 536).
Press keys on your keyboard to generate entropy (bits = 600).
Press keys on your keyboard to generate entropy (bits = 664).
Press keys on your keyboard to generate entropy (bits = 728).
Press keys on your keyboard to generate entropy (bits = 792).
Press keys on your keyboard to generate entropy (bits = 856).
Press keys on your keyboard to generate entropy (bits = 920).
Press keys on your keyboard to generate entropy (bits = 984).
Writing corosync key to /etc/corosync/authkey.
We can accelerate the key generation process, using this command inside another terminal :
[root@node1 ~]# dd if=/dev/urandom of=output.txt
When the key is generated, stop the dd comand and remove the file output.txt.
[root@node1 ~]# rm output.txt
And it’s an important step, by default only root can read the authentication key, just to be sure type the following commands :
[root@node1 ~]# chown root:root /etc/corosync/authkey
[root@node1 ~]# chmod 400 /etc/corosync/authkey
4.4 Configure Corosync
Create the corosync configuration file by copying it from the sample one :
[root@node1 ~]# cp /etc/corosync/corosync.conf.example /etc/corosync/corosync.conf
Edit it like that :
totem {
        version: 2
        crypto_cipher: aes256
        crypto_hash: sha256

        interface {
                ringnumber: 0
                bindnetaddr: 192.168.88.10
                mcastaddr: 239.255.1.1
                mcastport: 5405
                ttl: 1
        }
}

logging {
        fileline: off
        to_stderr: no
        to_logfile: yes
        logfile: /var/log/cluster/corosync.log
        to_syslog: no
        debug: off
        timestamp: on
        logger_subsys {
                subsys: QUORUM
                debug: off
        }
}

quorum {
        provider: corosync_votequorum
}

nodelist {
        node {
                ring0_addr: 192.168.88.10
                nodeid: 1
        }
        node {
                ring0_addr: 192.168.88.20
                nodeid: 2
        }
        node {
                ring0_addr: 192.168.88.30
                nodeid: 3
        }
}
- Uncomment
provider: corosync_votequorum - Enable
crypto_ciphertoaes256 - Enable
crypto_hashtosha256 - Change
bindnetaddrwith the IP address of your cluster node
Let’s explain at the following terms :
crypto_cipher: cipher algo used to encrypt cluster communication traffic ;crypto_hash: hash algo used to encrypt cluster communication traffic ;bindnetaddr: corosync will listen on the IP address configured ;quorum: enable the quorum capabilities.
4.5 Distribute the configuration and key files
After that copy the authentication key and the configuration file to all other nodes via SSH :
[root@node1 ~]# scp /etc/corosync/corosync.conf node2:/etc/corosync
[root@node1 ~]# scp /etc/corosync/corosync.conf node3:/etc/corosync
[root@node1 ~]# scp /etc/corosync/authkey node2:/etc/corosync
[root@node1 ~]# scp /etc/corosync/authkey node2:/etc/corosync
Do not forget, we must change the bindnetaddr parameter to the IP address of each cluster node.
4.6 Start and check the corosync service
To finish, start the corosync service on all our cluster nodes :
[root@node1 ~]# systemctl start corosync
Check the corosync membership status :
[root@node1 ~]# corosync-cmapctl | grep members
runtime.totem.pg.mrp.srp.members.1.config_version (u64) = 0
runtime.totem.pg.mrp.srp.members.1.ip (str) = r(0) ip(192.168.88.10)
runtime.totem.pg.mrp.srp.members.1.join_count (u32) = 1
runtime.totem.pg.mrp.srp.members.1.status (str) = joined
runtime.totem.pg.mrp.srp.members.2.config_version (u64) = 0
runtime.totem.pg.mrp.srp.members.2.ip (str) = r(0) ip(192.168.88.20)
runtime.totem.pg.mrp.srp.members.2.join_count (u32) = 1
runtime.totem.pg.mrp.srp.members.2.status (str) = joined
runtime.totem.pg.mrp.srp.members.3.config_version (u64) = 0
runtime.totem.pg.mrp.srp.members.3.ip (str) = r(0) ip(192.168.88.30)
runtime.totem.pg.mrp.srp.members.3.join_count (u32) = 1
runtime.totem.pg.mrp.srp.members.3.status (str) = joined
Continue and check the quorum now :
[root@node1 ~]# corosync-quorumtool
Quorum information
------------------
Date:             Thu Nov  5 17:54:12 2015
Quorum provider:  corosync_votequorum
Nodes:            3
Node ID:          1
Ring ID:          148
Quorate:          Yes

Votequorum information
----------------------
Expected votes:   3
Highest expected: 3
Total votes:      3
Quorum:           2
Flags:            Quorate

Membership information
----------------------
    Nodeid      Votes Name
         1          1 192.168.88.10 (local)
         2          1 192.168.88.20
         3          1 192.168.88.30
As we can see on the previous output, there are different sections :
nodes: number of our cluster nodes connected ;expected votes: number of expected votes in the current configuration ;highest expected: number of highest expected votes possible in the current configuration ;total votes: number of total votes possible ;quorum: number of votes required to reach the quorum ;
4.7 Backup Corosync configuration file
Backup the working corosync configuration file, we will need it later on :
[root@node1 ~]# cp /etc/corosync/corosync.conf /etc/corosync/corosync.conf.bak
5. Installing and configuring Pacemaker
Now, we can install the cluster management layer.
5.1 Allow Pacemaker traffic
Like Corosync, we must add a firewall rule to allow Pacemaker traffic, by default using TCP port 2224.
[root@node1 ~]# firewall-cmd --permanent --add-port=2224/udp
success
Moreover, do not forget to reload the firewall configuration :
[root@node1 ~]# firewall-cmd --reload
success
5.2 Install and enable Pacemaker at the boot
Then, install the Pacemaker package and start it at boot :
[root@node1 ~]# yum install pacemaker -y
[root@node1 ~]# systemctl enable pacemaker
5.3 Install and enable PCS at the boot
PCS is a Pacemaker/Corosync configuration system using a cluster shell. It helps us for managing and configuring a cluster.
The package is already installed with Pacemaker. So we have just to enable it:
[root@node1 ~]# systemctl start pcsd
[root@node1 ~]# systemctl enable pcsd
Do not forget to do that among all cluster nodes.
5.4 Change the password for the hacluster user
hacluster user is used to authenticate the PCS daemon across the cluster nodes.
Choose a consistent password, the same for each node.
[root@node1 ~]# passwd hacluster
Changing password for user hacluster
New password:
Retype new password:
passwd: all authentication tokents updated successfully
It must be set on all cluster nodes
5.5 Authenticate the cluster node’s pcs deamons
To authenticate the PCS deamon across the cluster nodes, use this command :
[root@node1 ~]# pcs cluster auth 192.168.88.10 192.168.88.20 192.168.88.30
Username: hacluster
Password:
192.168.88.10: Authorized
192.168.88.20: Authorized
192.168.88.30: Authorized
5.6 Set up the cluster
For the first time, we need to set up the cluster with this command :
[root@node1 ~]# pcs cluster setup --name hacluster 192.168.88.10 192.168.88.20 192.168.88.30 --force
Shutting down pacemaker/corosync services...
Redirecting to /bin/systemctl stop pacemaker.service
Redirecting to /bin/systemctl stop corosync.service
Killing any remaining services...
Removing all cluster configuration files...
192.168.88.10: Succeeded
192.168.88.20: Succeeded
192.168.88.30: Succeeded
This set up will generate a new Corosync configuration file and distribute it across all nodes.
Because this file existed already, we have to use the --force parameter.
Then, overwrite the new Corosync configuration file with the one saved previously.
[root@node1 ~]# cp /etc/corosync/corosync.conf.bak /etc/corosync/corosync.conf
cp: overwrite '/etc/corosync/corosync.conf'? y
Next, distribute this file across the other cluster nodes :
[root@node1 ~]# scp /etc/corosync/corosync.conf node2:/etc/corosync/corosync.conf
[root@node1 ~]# scp /etc/corosync/corosync.conf node3:/etc/corosync/corosync.conf
Moreover, do not forget to change the bindnetaddrparameter on each cluster node.
5.7 Start the cluster
Finally, start the cluster on all the cluster nodes by using this single command :
[root@node1 ~]# pcs cluster start --all
192.168.88.10: Starting Cluster...
192.168.88.20: Starting Cluster...
192.168.88.30: Starting Cluster...
And check the cluster status :
[root@node1 ~]# pcs status
Cluster name:
WARNING: no stonith devices and stonith-enabled is not false
Last updated: Sun Nov 15 20:51:28 2015
Last change: Fri Nov  6 09:23:22 2015 by hacluster via crmd on node3.centos.local
Stack: corosync
Current DC: node1.centos.local (version 1.1.13-a14efad) - partition with quorum
3 nodes and 0 resources configured

Online: [ node1.centos.local node2.centos.local node3.centos.local ]

Full list of resources:

PCSD Status:
  node1.centos.local (192.168.88.10): Online
  node2.centos.local (192.168.88.20): Online
  node3.centos.local (192.168.88.30): Online

Daemon Status:
  corosync: active/enabled
  pacemaker: active/enabled
  pcsd: active/enabled
We can see there is no resource configured and 3 nodes online. The warning about STONITH is normal, we will configure that later on.
6. Resource manager
As written above, we manage the Pacemaker cluster resource with a command-line tool PCS.
6.1 Check the configuration
In our current configuration, we have a WARNING about the STONITH option.
This is a cluster node fencing feature enabled by default.
We disable it for the moment, and get back to it later on :
[root@node1 ~]# pcs property set stonith-enabled=false
Then, we can validate our cluster configuration with the command “crm_verify” :
[root@node1 ~]# crm_verify -L -V
6.2 Configure a resource
To create a new resource on our new cluster, we use the PCS shell :
[root@node1 ~]# pcs resource create --help
We add a cluster IP resource and bind it to the network interface eno16777736 (to change according your network configuration) :
[root@node1 ~]# pcs resource create ClusterIP ocf:heartbeat:IPaddr2 ip=192.168.88.100 cidr_netmask=24 nic=eno16777736
We continue by adding an Apache web server cluster resource. But before, apache must be installed on each cluster nodes.
[root@node1 ~]# yum install httpd -y
Next we can add the resource with the following command :
[root@node1 ~]# pcs resource create WebServer ocf:heartbeat:apache configfile=/etc/httpd/conf/httpd.conf
Now we can check the status of our Pacemaker cluster :
[root@node1 ~]# pcs status
Cluster name:
Last updated: Mon Nov 16 17:46:46 2015
Last change: Sun Nov 15 16:51:43 2015 by hacluster via crmd on node3.centos.local
Stack: corosync
Current DC: node1.centos.local (version 1.1.13-a14efad) - partition with quorum
3 nodes and 2 resources configured

Online: [ node1.centos.local node2.centos.local node3.centos.local ]

Full list of resources:

     ClusterIP  (ocf::heartbeat:IPaddr2):       Started node1.centos.local
     WebServer  (ocf::heartbeat:apache):        Started node2.centos.local

PCSD Status:
  node1.centos.local (192.168.88.10): Online
  node2.centos.local (192.168.88.20): Online
  node3.centos.local (192.168.88.30): Online

Daemon Status:
  corosync: active/enabled
  pacemaker: active/enabled
  pcsd: active/enabled
As we can see, under the full list of resources section, we have our two ones ClusterIP and WebServer running on the node1.centos.local and node2.centos.local.
We can list only all cluster resources configured, using this command :
[root@node1 ~]# pcs resource show
6.3 Configure a resource constraint
A resource constraint can be configured in three different ways :
- Location constraint : if we want a resource running on a specific cluster node.
[root@node1 ~]# pcs constraint location --help - Order constraint : if we want to configure the start and stop order for our resources.
[root@node1 ~]# pcs constraint order --help - Colocation constraint : if we want to create a cluster group and running it on the same cluster node.
[root@node1 ~]# pcs constraint colocation --help
We create a new colocation constraint with our two resources previously created :
[root@node1 ~]# pcs constraint colocation add ClusterIP WebServer
Now if we check the status of our cluster, we can see both cluster resources ClusterIP and WebServer are running on the same node node1.centos.local :
Full list of resources:

     ClusterIP  (ocf::heartbeat:IPaddr2):       Started node1.centos.local
     WebServer  (ocf::heartbeat:apache):        Started node1.centos.local
Then, we add a constraint order to start the ClusterIP before the WebServer resource :
[root@node1 ~]# pcs constraint order set ClusterIP WebServer
Show all constraints configured with this command :
[root@node1 ~]# pcs constraint show
Location Constraints:
Ordering Constraints:
  Resource Sets:
    set ClusterIP WebServer
Colocation Constraints:
  ClusterIP with WebServer
6.4 Configure a resource group
To simplify the management of our resources, we can create a resources group :
[root@node1 ~]# pcs resource group add WebSite ClusterIP WebServer
And display the status of our cluster :
Full list of resources:

 Resource Group: WebSite
     ClusterIP  (ocf::heartbeat:IPaddr2):       Started node1.centos.local
     WebServer  (ocf::heartbeat:apache):        Started node1.centos.local
6.5 Move a resource
We can move our resources group previously created :
[root@node1 ~]# pcs resource move WebSite node3.centos.local
Full list of resources:

 Resource Group: WebSite
     ClusterIP  (ocf::heartbeat:IPaddr2):       Started node3.centos.local
     WebServer  (ocf::heartbeat:apache):        Started node3.centos.local
6.6 Stop a resource
To stop a resource :
[root@node1 ~]# pcs resource disable WebSite
Full list of resources:

 Resource Group: WebSite
     ClusterIP  (ocf::heartbeat:IPaddr2):       Stopped
     WebServer  (ocf::heartbeat:apache):        Stopped
6.7 Start a resource
To start a resource :
[root@node1 ~]# pcs resource enable WebSite
Full list of resources:

 Resource Group: WebSite
     ClusterIP  (ocf::heartbeat:IPaddr2):       Started node3.centos.local
     WebServer  (ocf::heartbeat:apache):        Started node3.centos.local
6.8 Ban a resource
When we want to prevent a cluster resource from running on a specific cluster node, we can ban our resources group from node1.centos.local for example :
[root@node1 ~]# pcs resource ban WebSite node1.centos.local
6.9 Clear a resource constraint
When we moved a cluster resource to another cluster node, a location constraint is automatically created.
To clear it :
[root@node1 ~]# pcs resource clear WebSite node1.centos.local
6.10 Remove a resource constraint
To remove a resource constraint, use the following commands.
- colocation :
[root@node1 ~]# pcs constraint colocation remove WebServer ClusterIP
- order :
[root@node1 ~]# pcs constraint remove order WebServer ClusterIP
Now there are no constraints configured :
[root@node1 ~]# pcs constraint show
Location Constraints:
Ordering Constraints:
Colocation Constraints:
6.11 Remove a group of resources
For example, we can remove the group previously created WebSite :
[root@node1 ~]# pcs resource group remove WebSite
6.12 Remove a resource
To remove a resource :
[root@node1 ~]# pcs resource delete ClusterIP
[root@node1 ~]# pcs resource delete WebServer
Now there are no resources configured :
[root@node1 ~]# pcs resource show
NO resources configured
7. Node manager
7.1 Add a new cluster node
How add a new cluster node to our running cluster configuration, just stick with the following steps.
7.1.1 Operating system preparation
- Configure the network interfaces
- Configure the NTP
- Configure the DNS resolving
- Check network connectivity among the cluster nodes
7.1.2 Install and configure Corosync
- Allow the Corosync traffic through the firewall
- Install the Corosync package
- Copy the
corosync.confconfiguration file and theauthkeyauthentication key from our running configuration to the new node
[root@node1 ~]# scp /etc/corosync/corosync.conf node4:/etc/corosync/
[root@node1 ~]# scp /etc/corosync/authkey node4:/etc/corosync/
- Edit the Corosync configuration file on the new cluster node and change the
bindnetaddrparameter with the IP address assigned to this new node. Moreover, add the new node to thenodelistsection on all cluster nodes - Start the Corosync service on the new node
[root@node1 ~]# systemctl start corosync
7.1.3 Install and configure Pacemaker
- Install and start
PacemakerandPCSon the new node - Change the password for the
haclusteruser
[root@node4 ~]# passwd hacluster
- Authenticate the new node’s pcs deamon among all cluster nodes, repeat on each node
[root@node1 ~]# pcs cluster auth 192.168.88.40
Username: hacluster
Password:
192.168.88.40: Authorized
- Check the cluster status
[root@node1 ~]# pcs status
Cluster name:
Last updated: Tue Nov 17 10:59:35 2015
Last change: Mon Nov 16 15:15:47                                      2015 by hacluster via crmd on node3.centos.local
Stack: corosync
Current DC: node1.centos.local (version 1.1.13-a14efad) - partition with quorum
4 nodes and 2 resources configured

Online: [ node1.centos.local node2.centos.local node3.centos.local node4.centos.local ]

Full list of resources:

 Resource Group: WebSite
     ClusterIP  (ocf::heartbeat:IPaddr2):       Started node1.centos.local
     WebServer  (ocf::heartbeat:apache):        Started node1.centos.local

PCSD Status:
  node1.centos.local (192.168.88.10): Online
  node2.centos.local (192.168.88.20): Online
  node3.centos.local (192.168.88.30): Online
  node4.centos.local (192.168.88.40): Online

Daemon Status:
  corosync: active/enabled
  pacemaker: active/enabled
  pcsd: active/enabled
As we can see, our new node node4.centos.local is up and running among our existing cluster nodes.
7.2 Put in standby a cluster node
There is a feature including with Pacemaker, that allows us to put a desired cluster node into a standby mode.
The node configured in this state will no longer be able to host cluster resources and services.
This is useful for maintenance operations.
We can put a cluster node into standby mode :
[root@node1 ~] pcs cluster standby node4.centos.local
As we can see the node node4.centos.local is in a standby mode :
[root@node1 ~]# pcs status
Cluster name:
Last updated: Tue Nov 17 11:10:22 2015
Last change: Mon Nov 16 15:15:47                                      2015 by hacluster via crmd on node3.centos.local
Stack: corosync
Current DC: node1.centos.local (version 1.1.13-a14efad) - partition with quorum
4 nodes and 2 resources configured

Node node4.centos.local (4): standby
Online: [ node1.centos.local node2.centos.local node3.centos.local ]

Full list of resources:

 Resource Group: WebSite
     ClusterIP  (ocf::heartbeat:IPaddr2):       Started node1.centos.local
     WebServer  (ocf::heartbeat:apache):        Started node1.centos.local

PCSD Status:
  node1.centos.local (192.168.88.10): Online
  node2.centos.local (192.168.88.20): Online
  node3.centos.local (192.168.88.30): Online
  node4.centos.local (192.168.88.40): Online

Daemon Status:
  corosync: active/enabled
  pacemaker: active/enabled
  pcsd: active/enabled
Now we want to get out of standby this node with the following command :
[root@node1 ~] pcs cluster unstandby node4.centos.local
And all cluster nodes are online :
Online: [ node1.centos.local node2.centos.local node3.centos.local node4.centos.local ]
7.3 Remove a cluster node
Now we want to disable our last cluster node added node4.centos.local.
This doesn’t require a service downtime, except if the cluster service is running on the cluster node we would like to remove.
- Remove the cluster node from the
nodelistsection in the Corosync configuration file on all cluster nodes - Stop the cluster stack software
pcsd,Pacemaker, andCorosyncon the cluster node we want to remove
[root@node4 ~]# systemctl stop pcsd
[root@node4 ~]# systemctl stop pacemaker
[root@node4 ~]# systemctl stop corosync
- Check the cluster status, now as we can see
node4.centos.localis offline
Online: [ node1.centos.local node2.centos.local node3.centos.local ]
OFFLINE: [ node4.centos.local ]
8. Failover tests
8.1 Hardware failure
We will shutdown the node running our resources. First of all, we check which node is, with the following command :
[root@node1 ~]# pcs status
Cluster name:
Last updated: Thu Nov 19 10:15:46 2015
Last change: Wed Nov 18 17:51:12 2015 by root via cibadmin on node1.centos.local
Stack: corosync
Current DC: node2.centos.local (version 1.1.13-a14efad) - partition with quorum
3 nodes and 2 resources configured

Online: [ node1.centos.local node2.centos.local node3.centos.local ]


Full list of resources:

 Resource Group: WebSite
     ClusterIP  (ocf::heartbeat:IPaddr2):       Started node1.centos.local
     WebServer  (ocf::heartbeat:apache):        Started node1.centos.local

PCSD Status:
  node1.centos.local (192.168.88.10): Online
  node2.centos.local (192.168.88.20): Online
  node3.centos.local (192.168.88.30): Online

Daemon Status:
  corosync: active/enabled
  pacemaker: active/enabled
  pcsd: active/enabled
As we can see, it’s node1.centos.local, so we shutdown this server.
[root@node1 ~]# shutdown -h now
Then, we check again the status of our cluster on another node this time :
Online: [ node2.centos.local node3.centos.local ]
OFFLINE: [ node1.centos.local ]

Full list of resources:

 Resource Group: WebSite
     ClusterIP  (ocf::heartbeat:IPaddr2):       Started node2.centos.local
     WebServer  (ocf::heartbeat:apache):        Started node2.centos.local
All our resources have been moved to node2.centos.local.
And node1.centos.local is offline.
8.2 Network failure
In this second failure test, we will stop the network service on the node2.centos.local.
First, we have shutdown node1.centos.local in our previous hardware failure, start it again.
And check which node is running our services, it should be node2.centos.local.
Go on this server, and type the following command :
[root@node2 ~]# systemctl stop network
Next, verify the cluster status :
[root@node1 ~]# pcs status
Cluster name:
Last updated: Thu Nov 19 10:36:52 2015
Last change: Wed Nov 18 17:51:12                                      2015 by root via cibadmin on node1.centos.local
Stack: corosync
Current DC: node3.centos.local (version 1.1.13-a14efad) - partition with quorum
3 nodes and 2 resources configured

Online: [ node1.centos.local node3.centos.local ]
OFFLINE: [ node2.centos.local ]

Full list of resources:

 Resource Group: WebSite
     ClusterIP  (ocf::heartbeat:IPaddr2):       Started node1.centos.local
     WebServer  (ocf::heartbeat:apache):        Started node1.centos.local

PCSD Status:
  node1.centos.local (192.168.88.10): Online
  192.168.88.20: Offline
  node3.centos.local (192.168.88.30): Online

Daemon Status:
  corosync: active/enabled
  pacemaker: active/enabled
  pcsd: active/enabled
Great success, our resources are now node1.centos.local and node2.centos.local is offline.
Now you can fully manage a cluster stack software using Corosync, Pacemaker and PCS.
Let me know in comment if there is any issue, mistake… Thanks !
Stuff used to make this:
- Book : “CentOS High Availability” - Author Mitja Resman for documentation
- Website : markdown-it for Markdown parsing